
Some time ago I wrote the post: https://wordpress.com/post/msolenacrm.blog/4767
In the post, I was talking about the standard Microsoft connector not meeting my client’s security requirements. Pretty much, I was blocked and searching for a solution.
The only “security appropriate” solution was a custom connector but I didn’t know where to start. I asked my partner to investigate the issue and let me know if we could make a custom connector work the way all the requirements are addressed.
The license consideration
A custom connector requires a Premium Power Automate license.
The Solution
The work he has done is documented here. You MUST read his blog first then come back here for more details.
To summarise the article, we take the foundation for our connector from the standard Microsoft Entra ID connector but modify a thing or two in the source code to make it work for the particular security requirements.
We are going to use source code files to highlight the differences from the original implementation:
https://github.com/andrew-grischenko/azure-groups-limited-connector
Now let’s jump to the requirements!

Requirement 1. We need it to work in the application context, not a delegated user context. Therefore, we need authentication to utilize Client ID and Secret instead of user login and password.
How do we do it?
Let’s modify the apiProperties.json file to include a new section (search in the file for “Service Principal” to find the section on the screenshot below:

A deployment note
Please make sure you go to the Security section when the connector is deployed to enter Client ID, Tenant ID, and Secret then Update the connector.
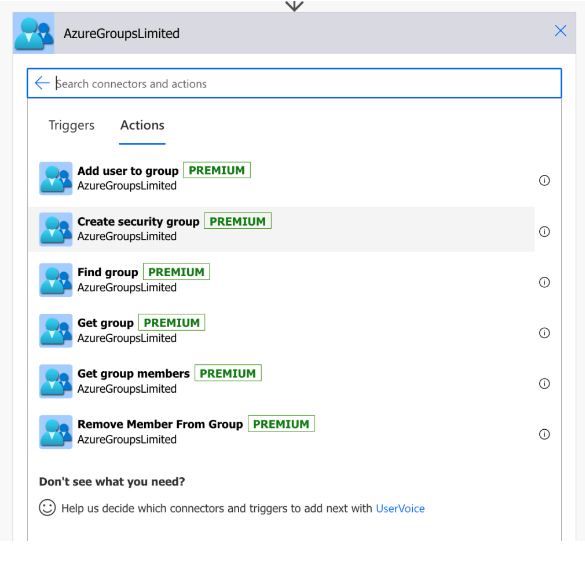
Requirement 2. We need to limit the connector scope as only a subset of action is required. All the additional actions need extra permissions, we don’t want that.
For this, we do two things:
we delete all unnecessary actions from the apiDefinition.swagger.json file. These are the actions we are keeping:
we update the scope anywhere it is mentioned in the files apiDefinition.swagger.json or apiProperties.json to only include Group.ReadWrite.All, GroupMember.ReadWrite.All like in the code below:
"security": [
{
"oauth2-auth": [
"Group.ReadWrite.All",
"GroupMember.ReadWrite.All",
"offline_access"
]
}
]
The last but not the least…
Requirement 3. We need to extend the Create Security Group action definition to include members and owners to be added to the group as one step.
Awesome! How do we do that?
We use a different method!
The original JSON code for “/v1.0/groups/securityGroup” parameters:
"parameters": [
{
"name": "body",
"in": "body",
"required": true,
"schema": {
"type": "object",
"required": [
"displayName",
"description",
"mailNickname",
"securityEnabled",
"mailEnabled"
],
"properties": {
"displayName": {
"x-ms-summary": "Display Name",
"type": "string",
"description": "Display name of the new group."
},
"description": {
"x-ms-summary": "Description",
"type": "string",
"description": "Description of the new group."
},
"mailNickname": {
"description": "The mail alias of the new group.",
"type": "string",
"x-ms-summary": "Mail Nickname"
},
"securityEnabled": {
"description": "True if the new group is a security group.",
"type": "boolean",
"x-ms-summary": "Security Enabled"
},
"mailEnabled": {
"description": "True if the new group is a mailing group.",
"type": "boolean",
"x-ms-summary": "Mail Enabled"
}
},
"x-ms-test-value": {
"description": "A group for development",
"displayName": "Test 530930",
"mailEnabled": true,
"mailNickname": "Test-Mail-Group-530930",
"securityEnabled": false
}
}
}
],
The modified one for Create Security Group will use “/v1.0/groups” with the parameters, including owners and members:
"parameters": [
{
"name": "body",
"in": "body",
"required": true,
"schema": {
"type": "object",
"properties": {
"displayName": {
"type": "string",
"title": "Display name",
"description": "Display name",
"x-ms-visibility": "important"
},
"description": {
"type": "string",
"title": "Description",
"description": "Description",
"x-ms-visibility": "important"
},
"mailEnabled": {
"type": "boolean",
"title": "Mail enabled",
"description": "Mail enabled",
"enum": [
true,
false
],
"default": false,
"x-ms-visibility": "internal"
},
"mailNickname": {
"type": "string",
"title": "Mail nickname",
"description": "Mail nickname",
"x-ms-visibility": "internal",
"default": "none"
},
"securityEnabled": {
"type": "boolean",
"title": "Security enabled",
"description": "Security enabled",
"enum": [
true,
false
],
"default": true,
"x-ms-visibility": "internal"
},
"owners@odata.bind": {
"type": "array",
"items": {
"type": "string",
"title": "Group owners",
"description": "Group owners",
"x-ms-visibility": "important"
},
"description": "Group owners"
},
"members@odata.bind": {
"type": "array",
"items": {
"type": "string",
"description": "Group members",
"title": "Group members",
"x-ms-visibility": "important"
},
"description": "Group members"
}
},
"required": [
"owners@odata.bind",
"description",
"securityEnabled",
"mailEnabled",
"displayName",
"mailNickname"
]
}
}
],
Simple and genius!
The conclusion
Sometimes with the standard connectors, you feel trapped and forced to make the wrong for your organization choices because “this is how Power Platform works”.
It’s not true. You always have a choice to get it right even if it requires a little bit of effort.
This post wouldn’t be possible without the work and influence of two great minds: Andrew Grischenko(https://www.linkedin.com/in/grischenko) and Zisis Kozlakidis(https://www.linkedin.com/in/zisis-kozlakidis/). You help me to search for better answers.

Leave a comment