• D365 user queue: control which emails are synced. Default to No email messages.

    Recently we set up Dynamics 365 App for Outlook for a customer.

    https://learn.microsoft.com/en-us/dynamics365/outlook-app/deploy-dynamics-365-app-for-outlook

    Dynamics 365 App for Outlook works with customer engagement apps (such as Dynamics 365 SalesDynamics 365 Customer ServiceDynamics 365 MarketingDynamics 365 Field ServiceDynamics 365 Project Service Automation, and Dynamics 365 Customer Engagement (on-premises), version 9), and model-driven Power Apps that run on Microsoft Dataverse.

    With Dynamics 365 App for Outlook, you can:

    • Link email messages, meetings, and appointments to a row in your app. For example, link an email message to a specific account, opportunity, or case.
    • View information in the context of an email message, meeting, or appointment.
    • Synchronize contacts and related information so that Exchange and your app is always up to date.
    • Add email templates, knowledge articles, and sales literature when you create an email message or set up a meeting.

    Copilot

    While we all look forward to moving our customers to Microsoft 365 Copilot for Sales (https://learn.microsoft.com/en-us/microsoft-sales-copilot/deploy-viva-sales-d365), with the functionality gaps and pricing and general AI adoption challenges, we couldn’t retire the good old Dynamics 365 App for Outlook just yet.

    Set up

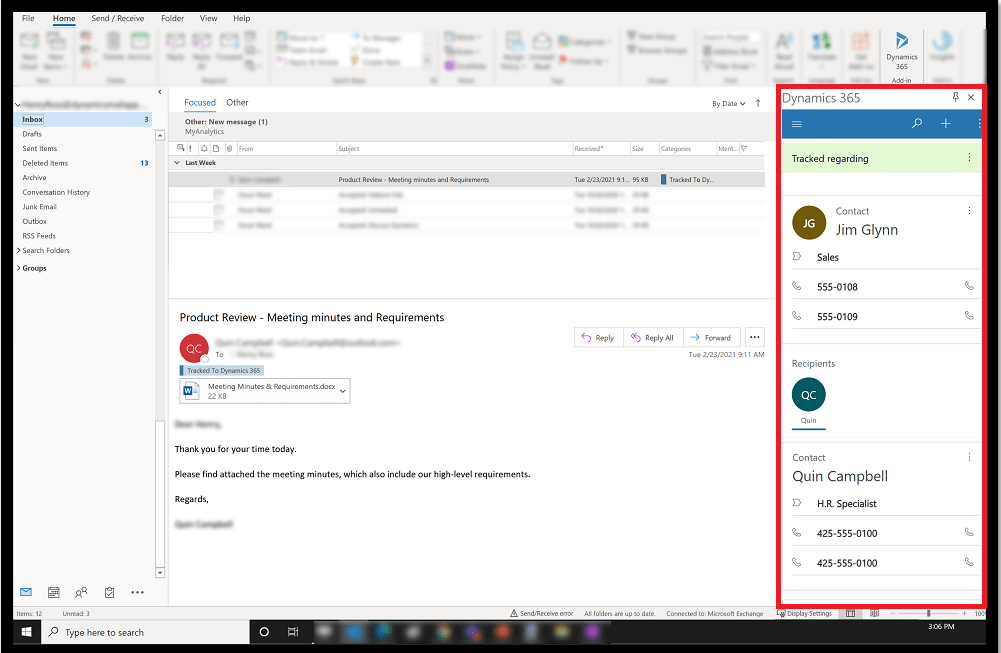
    You must enable server-side synchronisation as a part of the app deployment.

    Combined with user queue settings, it will create Email activities for your work emails.

    Let’s have a look at the queue setup!

    Convert Incoming Email To Activities is set to All email messages by default.

    Problem

    We want to change the default behaviour to NOT SYNC all messages to Dynamics 365.

    Cool! Easy!

    Yeah, but there is no way to define a system setting for all queues to Convert Incoming Email To Activities is set to All email messages by default.

    Solution

    Eureka! As the setting is a Queue column, we could probably change the default via customisation. Not ideal, but it’s a critical customer requirement so let’s try.

    Unfortunately, it’s locked.

    Let’s try to customise it via the classic interface then.

    And now, finding Queue table in the tree. Then Fields. Where’s my magic wand?

    One more window.

    Finally!

    Setting Default Value = No email messages. Don’t forget to Publish All Customizations.

    Done!

    Remember to bulk update the existing users column to No email messages for all user queues you want to change.

    Testing for a new queue…

    For all new users queue will be set to No email messages by default.

  • Integrate eSignature with Power Pages

    Use case: A user submits an application via the Power Pages website. We need the User’s electronic signature on the issued card. Our organisation uses DocuSign to digitally sign documents.

    Lucky us, Power Pages integrates with DocuSign out-of-the-box!

    Before you start, in the documentation, on the video and everywhere they tell you it’s only supported for the standard data model. IT’S NOT TRUE! It works for both.

    Otherwise, there are two main references for you to set up the integration:

    https://learn.microsoft.com/en-us/power-pages/admin/set-up-docusign-integration

    Also, there is a playlist from DocuSign here:

    https://dsucustomers.docusign.com/video-playlist-docusign-integrations-microsoft

    Now, what’s missing (apart from the doco data model “important message” screw-up)?

    The main missing thing for me was understanding what’s inside the Microsoft OOTB integration solution and how it works.

    I thought the diagram would fill in my gaps but unfortunately, it didn’t help either.

    The main reason it didn’t help was that I didn’t have much knowledge about DocuSign integration until now. How did I fix that?

    Let’s make sure we understand the dictionary first!

    In DocuSign, an envelope is a digital container used to send documents for electronic signatures. Think of it like a physical envelope that you would use to mail documents, but in a digital format. Here are some key points about DocuSign envelopes:

    • Document Container: An envelope can contain one or multiple documents that need to be signed.
    • Recipient Information: It holds details about the recipients, including their email addresses and the order in which they need to sign.
    • Fields and Tabs: Envelopes include the fields or tabs where recipients need to sign, initial, or provide other information.
    • Status Tracking: Envelopes have statuses such as sent, delivered, completed, or voided, allowing you to track the progress of the signing process.
    • Audit Trail: Each envelope generates a Certificate of Completion, which provides a full audit history of the transaction.

    This system ensures that all necessary documents are securely sent, signed, and tracked efficiently.

    In DocuSign, tabs (also known as fields or tags) are interactive elements placed within a document to guide recipients on where to sign, initial, or provide other required information. These tabs ensure that all necessary actions are completed accurately. Here are some common types of tabs:

    1. Signature Tabs: Indicate where the recipient needs to sign.
    2. Initial Here Tabs: Specify where the recipient should initial.
    3. Date Signed Tabs: Automatically populate with the date the document is signed.
    4. Text Tabs: Allow recipients to enter text, such as their name or address.
    5. Checkbox Tabs: Enable recipients to select options by checking boxes.
    6. Radio Button Tabs: Allow recipients to select one option from a group.
    7. Number Tabs: Let recipients enter numerical values.
    8. Full Name Tabs: Automatically fill with the recipient’s full name.

    These tabs help streamline the document signing process by ensuring all necessary information is collected accurately and efficiently.

    Now when we learn new words, we can move a bit further.

    The last thing before we get to “how it all works together” is the main components, everything, you can find in the Power Pages DocuSign Integration solution installed by the integration setup.

    How it works and what are the main parts (high-level)

    In DocuSign, we have a template with tabs we choose to create.

    These tabs will be populated with the user application data as defined in the mapping we set up for the related template:

    I haven’t tried multiple templates. Yet. It can be done, apparently.

    On the Power Pages website, a user fills in a multistep application form.

    In the last step, the DocuSign document template is displayed to the user with the available action to View and Sign.

    The template grid on the Sign Off step is a PCF control.

    Also, we have JavaScript on the Sign Off step. There are API calls to DocuSign via the Power Pages API. In case we need to debug/triage something.

    The template is configured for the step here:

    The user clicks View and Sign.

    The Power Automate flow is triggered. The one I highlighted.

    An envelope is created, and DocuSign template tabs are updated with the user information from the application. Using the mapping we described above.

    If you haven’t created the mapping the Flow will fail. It’s not required but it is.To fix it, remove the empty record from the DocuSign Tabs table.

    The envelope gets sent.

    The content is displayed to the user via the Embedded Signing URL which is generated by the Flow and returned to Power Pages.

    The user signs the document.

    The second flow is triggered to update the record status in the Dataverse for the DocuSign Outputs table when the DocuSign envelope status is updated.

    As I mentioned, you can find it all in the Power Pages DocuSign Integration solution.

    There are 3 tables in the solution:

    These are config tables. I had to fix one of the automation by removing a broken record.

    It’s good to know you can do this.

    We are still investigating the integration. By breaking everything and trying to repair.

    I will follow up with another blog post on the same topic as I discover more useful information.

    As always, thank you very much to Nick Doelman(https://www.linkedin.com/in/nickdoelman) and a special Thank you to Artur Tkachenko(https://www.linkedin.com/in/artur-tkachenko-ab604399/) for setting it all up and helping me in thinking!

    TO BE CONTINUED…

  • Power Pages: Upload large files – work in progress

    On the project, we need our portal users to be able to upload large video files. It’s required for incident investigations.

    As we all know, the large file upload was one of the top-asked features. So now we could finally use it with Power Pages. Yay!

    No code

    The official documentation is here:

    https://learn.microsoft.com/en-us/power-platform/release-plan/2024wave1/power-pages/upload-files-up-10-gb-azure-blob-storage-power-pages

    The amazing Nick Doelman’s video with the step-by-step set-up instructions is here:

    Thank you very much, Nick! Your video saved me lots of time! 💖

    So, I got it all working but unfortunately, it doesn’t fully cover our end-to-end process at the moment.

    Let’s say, I need to implement these two scenarios, ideally working OOTB without coding.

    Scenario 1: A Power Pages user can upload large files from a portal to Azure BLOB.

    Scenario 2: A Dynamics 365 user can download the file from Azure BLOB to review video footage.

    Scenario 1 works fine. However, the code for Scenario 2 is not available at the moment, not for a new, enhanced data model.

    It used to work like this: Add Azure storage web resource to a form | Microsoft Learn

    What’s not working now? Personally, I couldn’t find the web resource mentioned in the article above in a new data model. Honestly, the HTML resource sounds a bit outdated anyway. So I hope a new control will be released very soon.

    I think I will just go with a custom code for the Dynamics 365 file download.

    But first I will try to copy the page from the old website to see if anything from the old code could be repurposed. Maybe you will see it in the next article 😉

    Web API

    Even with Scenario 1 we still need to code as we use a Document Details custom table to store the uploaded file information. We have to populate the details during the upload – a file name, a type, a size and a location on the Document Details record. Also, we upload files to SharePoint and Azure storage both. To create a nice user experience we probably need to code.

    Fortunately, Web API is available for us!

    https://learn.microsoft.com/en-us/power-pages/configure/webapi-azure-blob

    First, I was determined to get it all working by following the instruction in the article but I gave up quickly. The approach taken in the article is a little bit like

    WOW! IT’S TOO MUCH!

    By following the steps we are trying to get fetch, upload, download and delete working – all at once! Debugging the code if something isn’t working (never happened to us before) would be a nightmare.

    For now, I only need a part where a user uploads a file. Let’s focus on uploading first!

    Upload file

    Follow the article to Step 3. Make sure the table you use to attach the file is covered by Table permissions. Plus child permission for Notes. I use a custom Case table (tema_case).

    I also found I need to enable Web API for my custom table as I was getting an error like this:

    {
      "error": {
        "code": "90040101",
        "message": "Attribute tema_caseid in table tema_case is not enabled for Web Api."
      }
    }

    So I added this to the Site Settings:

    Site setting nameValue
    Webapi/tema_case/enabledtrue
    Webapi/tema_case/fields*

    As I let a user to upload files from the Updae Case form, I use a Basic form Additional Settings to add the JavaScript code:

    Now, let’s add the upload file control to the form. As it’s only a POC, I added it to the end of the panel like this:

    $(document).ready(function (){
        $("#EntityFormPanel").append( "<input type='file' id='fileinput' name='fileinput' onchange='uploadFileinChunks();' />" );   
    }); 

    Looks like this on the page:

    Here I used Microsoft code from the article and just cleaned it a bit to only leave the bits which are absolutely required. It’s easier to debug and also understand.

    When the file is selected we call the uploadFileinChunks() function. Getting the entityName and Id, constructing the Web API URL. Getting the file name and size from the upload file control we added to the form.

    function uploadFileinChunks()
    {    
        var entityName = "tema_case";//replace with yours
        var entityId = window.location.search.substring(4);
        
        var url = "/_api/file/InitializeUpload/" + entityName + "(" + entityId + ")/blob"
        var elementToChooseFile = document.getElementById("fileinput");
        var filename = "";
        if (elementToChooseFile.files.length > 0) {
            filename = elementToChooseFile.files[0].name;
            filesizeelement = elementToChooseFile.files[0].size / 1048576;      
            const encodedFileName = encodeURIComponent(filename);
            filename = encodedFileName;

    Checking if we have the file or displaying an alert “No file chosen.”

    We upload the file in chunks. As it’s large! 🙂

    If we have the file then we try to figure out a number of blocks for the upload.

    if (elementToChooseFile.files.length > 0 && elementToChooseFile.files[0].size > 0)
            {
                const chunkSize = 50*1024 *1024;
                let numberOfBlocks;
                let token;
                if (elementToChooseFile.files[0].size % chunkSize == 0)
                {
                    numberOfBlocks = elementToChooseFile.files[0].size / chunkSize;
                }
                else
                {
                    numberOfBlocks = parseInt(elementToChooseFile.files[0].size / chunkSize, 10) + 1;
                }
                //TO BE ADDED
                
             }
            else{
                alert("No file chosen.");
            }
        }

    We need the actual safeAjax function to take care of the upload:

    (function(webapi, $){
                    function safeAjax(ajaxOptions) {
                        var deferredAjax = $.Deferred();
    
                        shell.getTokenDeferred().done(function (token) {
                        // add headers for AJAX
                        if (!ajaxOptions.headers) {
                        $.extend(ajaxOptions, {
                            headers: {
                                "__RequestVerificationToken": token
                            }
                        }); 
                        } else {
                        ajaxOptions.headers["__RequestVerificationToken"] = token;
                    }
                    $.ajax(ajaxOptions)
                        .done(function(data, textStatus, jqXHR) {
                            validateLoginSession(data, textStatus, jqXHR, deferredAjax.resolve);
                        }).fail(deferredAjax.reject); //AJAX
                }).fail(function () {
                    deferredAjax.rejectWith(this, arguments); // on token failure pass the token AJAX and args
                });
    
                return deferredAjax.promise();  
            }
            webapi.safeAjax = safeAjax;
        })(window.webapi = window.webapi || {}, jQuery)
    

    Now, the fun part, calling the function:

     webapi.safeAjax({
                    type: "POST",
                    url: url,
                    headers: { "x-ms-file-name": elementToChooseFile.files[0].name, "x-ms-file-size": elementToChooseFile.files[0].size },
                    contentType: "application/octet-stream",
                    processData: false,
                    data: {},
                    success: function (response, status, xhr)
                    {
                        token = response;                   
                        uploadFileChunk(0);
                    },
                    error: function (XMLHttpRequest, textStatus, errorThrown)
                    {
                        alert(XMLHttpRequest.responseText);
                    }
                });

    Here we call the uploadFileChunk function recursively, incrementing the blockno until the upload is completed.

    function uploadFileChunk(blockno)
    {
        var fileReader = new FileReader();
    
        if (blockno < numberOfBlocks)
        {
            var end = (blockno * chunkSize + chunkSize) > elementToChooseFile.files[0].size ? blockno * chunkSize + elementToChooseFile.files[0].size % chunkSize : blockno * chunkSize + chunkSize;
            var content = elementToChooseFile.files[0].slice(blockno * chunkSize, end);
            fileReader.readAsArrayBuffer(content);
        }
        fileReader.onload = function ()
        {
            webapi.safeAjax({
                type: "PUT",
                url: "/_api/file/UploadBlock/blob?offset=" + (blockno * chunkSize) + "&fileSize=" + elementToChooseFile.files[0].size + "&chunkSize=" + chunkSize + "&token=" + token,
                headers: { "x-ms-file-name": elementToChooseFile.files[0].name },
                contentType: "application/octet-stream",
                processData: false,
                data: content,
                success: function (res) {                            
                    var percentComplete = ((parseFloat(end) / parseFloat(elementToChooseFile.files[0].size)) * 100).toFixed(2);
                    alert("Completed: "+percentComplete);                               
                    if (percentComplete == 100) {
                       alert("File upload is completed.");                                  
                    }
                    uploadFileChunk(blockno + 1);
                },
                error: function (XMLHttpRequest, textStatus, errorThrown) {
                    alert(XMLHttpRequest.responseText);
                }
            });
        }
    }

    As I said, it doesn’t have a progress bar, it doesn’t display the file info. I used alerts to display the information of the % of the file load.

    The whole block of code is here (replace double quotes with the correct characters) :

    $(document).ready(function (){
        $("#EntityFormPanel").append("<input type='file' id='fileinput' name='fileinput' onchange='uploadFileinChunks();' />" );   
    }); 
    
    (function(webapi, $){
                    function safeAjax(ajaxOptions) {
                        var deferredAjax = $.Deferred();
    
                        shell.getTokenDeferred().done(function (token) {
                        // add headers for AJAX
                        if (!ajaxOptions.headers) {
                        $.extend(ajaxOptions, {
                            headers: {
                                "__RequestVerificationToken": token
                            }
                        }); 
                        } else {
                        ajaxOptions.headers["__RequestVerificationToken"] = token;
                    }
                    $.ajax(ajaxOptions)
                        .done(function(data, textStatus, jqXHR) {
                            validateLoginSession(data, textStatus, jqXHR, deferredAjax.resolve);
                        }).fail(deferredAjax.reject); //AJAX
                }).fail(function () {
                    deferredAjax.rejectWith(this, arguments); // on token failure pass the token AJAX and args
                });
    
                return deferredAjax.promise();  
            }
            webapi.safeAjax = safeAjax;
        })(window.webapi = window.webapi || {}, jQuery)
    
    function uploadFileinChunks()
    {    
        var entityName = "tema_case";
        var entityId = window.location.search.substring(4);
        
        var url = "/_api/file/InitializeUpload/" + entityName + "(" + entityId + ")/blob"
        var elementToChooseFile = document.getElementById("fileinput");
        var filename = "";
        if (elementToChooseFile.files.length > 0) {
            filename = elementToChooseFile.files[0].name;
            filesizeelement = elementToChooseFile.files[0].size / 1048576;      
            const encodedFileName = encodeURIComponent(filename);
            filename = encodedFileName;
    
            if (elementToChooseFile.files.length > 0 && elementToChooseFile.files[0].size > 0)
            {
                const chunkSize = 50*1024 *1024;
                let numberOfBlocks;
                let token;
                if (elementToChooseFile.files[0].size % chunkSize == 0)
                {
                    numberOfBlocks = elementToChooseFile.files[0].size / chunkSize;
                }
                else
                {
                    numberOfBlocks = parseInt(elementToChooseFile.files[0].size / chunkSize, 10) + 1;
                }
    
                webapi.safeAjax({
                    type: "POST",
                    url: url,
                    headers: { "x-ms-file-name": elementToChooseFile.files[0].name, "x-ms-file-size": elementToChooseFile.files[0].size },
                    contentType: "application/octet-stream",
                    processData: false,
                    data: {},
                    success: function (response, status, xhr)
                    {
                        token = response;                   
                        uploadFileChunk(0);
                    },
                    error: function (XMLHttpRequest, textStatus, errorThrown)
                    {
                        alert(XMLHttpRequest.responseText);
                    }
                });
                function uploadFileChunk(blockno)
                {
                    var fileReader = new FileReader();
    
                    if (blockno < numberOfBlocks)
                    {
                        var end = (blockno * chunkSize + chunkSize) > elementToChooseFile.files[0].size ? blockno * chunkSize + elementToChooseFile.files[0].size % chunkSize : blockno * chunkSize + chunkSize;
                        var content = elementToChooseFile.files[0].slice(blockno * chunkSize, end);
                        fileReader.readAsArrayBuffer(content);
                    }
                    fileReader.onload = function ()
                    {
                        webapi.safeAjax({
                            type: "PUT",
                            url: "/_api/file/UploadBlock/blob?offset=" + (blockno * chunkSize) + "&fileSize=" + elementToChooseFile.files[0].size + "&chunkSize=" + chunkSize + "&token=" + token,
                            headers: { "x-ms-file-name": elementToChooseFile.files[0].name },
                            contentType: "application/octet-stream",
                            processData: false,
                            data: content,
                            success: function (res) {                            
                                var percentComplete = ((parseFloat(end) / parseFloat(elementToChooseFile.files[0].size)) * 100).toFixed(2);
                                alert("Completed:"+percentComplete);                               
                                if (percentComplete == 100) {
                                   alert("File upload is completed.");                                  
                                }
                                uploadFileChunk(blockno + 1);
                            },
                            error: function (XMLHttpRequest, textStatus, errorThrown) {
                                alert(XMLHttpRequest.responseText);
                            }
                        });
                    }
                }
             }
            else{
                alert("No file chosen.");
            }
        }
        
    }

    Now as we got the basics working we could start adding the additional features.

    You could also try the additional functions from the article. Adding it one by one.

    File info in Dynamics 365 attached to the Case record as a txt file:

    And in Azure storage container:

    Hope it all makes sense.

  • Power Pages Bing Address Validation (Autosuggest)

    Updated version below…

    Two things before we start.

    First, I am genuinely surprised that I couldn’t find a Power Pages article on this topic.

    I feel almost embarrassed posting this, as it seems like everyone else knows how to do it.

    Yet, I have a rule: if I struggle with something, there must be someone somewhere trying to build something similar. For the person crying for help somewhere in the world… here you go! I hope this helps you feel better 🙂

    Second, the functionality I am talking about won’t exist for long. But we all know how dev works. I promise you another one for the Azure Maps soon.

    Important announcement!

    Bing Maps for Enterprise is deprecated and will be retired. Enterprise account customers can continue to use Bing Maps for Enterprise services until June 30th, 2028. Free (Basic) account customers can continue to use Bing Maps for Enterprise services until June 30th, 2025. To avoid service disruptions, all implementations using Bing Maps for Enterprise REST APIs and SDKs will need to be updated to use Azure Maps by the retirement date that applies to your Bing Maps for Enterprise account type. For migration documentation, please see Bing Maps Migration Overview. For more details on the retirement, see the announcement on the Bing Maps Blog.

    And as always, WHY and WHY NOW.

    We are replacing Canvas App with the Power Pages website. The app had the autosuggest functionality implemented so we need it as well. For Canvas App we have Azure Maps validation OOTB:

    https://learn.microsoft.com/en-us/power-apps/maker/canvas-apps/geospatial-component-input-address

    OK. All formalities are finished. Let’s get to work!

    This is a great article here, basically, giving you a working HTML:

    https://learn.microsoft.com/en-us/bingmaps/v8-web-control/map-control-concepts/autosuggest-module-examples/filling-in-an-address-form-example

    You just need to get a Bing Maps key on a dev portal here:

    https://www.bingmapsportal.com/

    OK. We’ve got a working HTML with the address validation.

    But how do you say it in Power Pages?

    Let’s see what we need to do and what’s the difference. The original HTML is below for your reference.

    <!DOCTYPE html>
    <html>
    <head>
        <title></title>
        <meta charset="utf-8" />
    	<script type='text/javascript'>
        function GetMap() {
            Microsoft.Maps.loadModule('Microsoft.Maps.AutoSuggest', {
                callback: function () {
                    var manager = new Microsoft.Maps.AutosuggestManager({
                        placeSuggestions: false
                    });
                    manager.attachAutosuggest('#searchBox', '#searchBoxContainer', selectedSuggestion);
                },
                errorCallback: function(msg){
                    alert(msg);
                },
                credentials: 'Your Bing Maps Key' 
            });
        }
    
        function selectedSuggestion(result) {
            //Populate the address textbox values.
            document.getElementById('addressLineTbx').value = result.address.addressLine || '';
            document.getElementById('cityTbx').value = result.address.locality || '';
            document.getElementById('countyTbx').value = result.address.district || '';
            document.getElementById('stateTbx').value = result.address.adminDistrict || '';
            document.getElementById('postalCodeTbx').value = result.address.postalCode || '';
            document.getElementById('countryTbx').value = result.address.countryRegion || '';
        }
        </script>
        <style>
            #searchBox {
                width: 400px;
            }
            
            .addressForm {
                margin-top:10px;
                background-color: #008272;
                color: #fff;
                border-radius:10px;
                padding: 10px;
            }
    
            .addressForm input{
                width:265px;
            }
        </style>
        http://www.bing.com/api/maps/mapcontrol?callback=GetMap
    </head>
    <body>
        <div id='searchBoxContainer'>
            <input type='text' id='searchBox'/>
        </div>
    
        <table class="addressForm">
            <tr><td>Street Address:</td><td><input type="text" id="addressLineTbx"/></td></tr>
            <tr><td>City:</td><td><input type="text" id="cityTbx"/></td></tr>
            <tr><td>County:</td><td><input type="text" id="countyTbx"/></td></tr>
            <tr><td>State:</td><td><input type="text" id="stateTbx"/></td></tr>
            <tr><td>Zip Code:</td><td><input type="text" id="postalCodeTbx"/></td></tr>
            <tr><td>Country:</td><td><input type="text" id="countryTbx"/></td></tr>
        </table>
    </body>
    </html>

    First, we need to include this script below between the <head> tags :

    http://www.bing.com/api/maps/mapcontrol?callback=GetMap

    In our Power Pages Management app we find or create a content snippet “Head/Bottom”:

    Add the script link there.

    Next, what do we do with the rest of the script? It depends.

    If you want to add it to all pages on your website and nothing changes in terms of the control name you use across, you could technically keep it inside <head>.

    I will add it to the page that I know contains the form requiring address validation.

    Even before we touch the script. Let’s check we have all the fields required and list all the field names as we need them to modify the script.

    We need an Address Search field, for the POC I used an existing field, address1_name.

    And for the address fields, for my form, it will be:

    Street:address1_line1
    City:address1_city
    State:address1_stateorprovince
    Postal Code:address1_postalcode
    Country:address1_country

    OK. Let’s put the script on the page.

    HERE I PUT THE UPDATE>

    In the old version, I put the script on the web page. It’s better to put it on the form instead. I had to call GetMap() explicitly to get it working and now it works as designed. I had to delete some steps in the article to reflect the change.

    In the original HTML, we have a searchBox wrapped in the searchBoxContainer <div>.

    <div id='searchBoxContainer'>
            <input type='text' id='searchBox'/>
        </div>

    If you inspect the custom search address input you added to the form on the portal, it is also wrapped in <div> but it doesn’t have an ID.

    From the documentation here https://learn.microsoft.com/en-us/bingmaps/v8-web-control/modules/autosuggest-module/autosuggestmanager-class, the attachAutosuggest method requires the suggestedContainerId to be specified.

    NameReturn TypeDescription
    attachAutosuggest(suggestionBoxId: string, suggestionContainerId: string, selectedSuggestionCallback: function(result:SuggestionResult))Attaches the Autosuggest functionality to an input box.

    • suggestionBoxId – The HTML element identifier of the input box.
    • suggestionContainerId – The Id of container where suggestions will be displayed.
    • selectedSuggestionCallback – A reference to a callback function that will be called when a user selects a suggestion from the Autosuggest UI.

    This is how we add ID to the existing <div> container:

    $(document).ready(function() {    
          $("#address1_name").parent().attr("id", "searchBoxContainer");    
            
    });

    What else is left?

    We place two functions code, GetMap and selectSuggestion, outside $(document).ready:

    function GetMap() {           
                Microsoft.Maps.loadModule('Microsoft.Maps.AutoSuggest', {
                    callback: function () {
                        var manager = new Microsoft.Maps.AutosuggestManager({
                            placeSuggestions: false,
                            countryCode : 'AU'
                        });                   
                        manager.attachAutosuggest('#address1_name', '#searchBoxContainer', selectedSuggestion);
                      
                    },
                    errorCallback: function(msg){
                        alert(msg);
                    },
                    credentials: 'YOUR BING MAP KEY' 
                });        
            } 
        
            function selectedSuggestion(result) {            
                //Populate the address textbox values.            
                $("#address1_line1").val(result.address.addressLine || '');
                $("#address1_city").val(result.address.locality || '');           
                $("#address1_stateorprovince").val(result.address.adminDistrict || '');
                $("#address1_postalcode").val(result.address.postalCode || '');
                $("#address1_country").val(result.address.countryRegion || '');
            }

    we populate address fields from the result object.

    I used AutosuggestOptions Object https://learn.microsoft.com/en-us/bingmaps/v8-web-control/modules/autosuggest-module/autosuggestoptions-object countryCode property to limit suggestions to the Australian addresses.

    This is the complete JavaScript code I put on the page (address1_name in the code is your search address custom field):

    $(document).ready(function() {    
          $("#address1_name").parent().attr("id", "searchBoxContainer");        
    });
    
    function GetMap() {           
                Microsoft.Maps.loadModule('Microsoft.Maps.AutoSuggest', {
                    callback: function () {
                        var manager = new Microsoft.Maps.AutosuggestManager({
                            placeSuggestions: false,
                            countryCode : 'AU'
                        });                   
                        manager.attachAutosuggest('#address1_name', '#searchBoxContainer', selectedSuggestion);
                      
                    },
                    errorCallback: function(msg){
                        alert(msg);
                    },
                    credentials: 'YOUR BING MAP KEY' 
                });        
            } 
        
            function selectedSuggestion(result) {            
                //Populate the address textbox values.            
                $("#address1_line1").val(result.address.addressLine || '');
                $("#address1_city").val(result.address.locality || '');           
                $("#address1_stateorprovince").val(result.address.adminDistrict || '');
                $("#address1_postalcode").val(result.address.postalCode || '');
                $("#address1_country").val(result.address.countryRegion || '');
            }

    Finally, this is the screenshot of the working page below:

    Hope it helps.