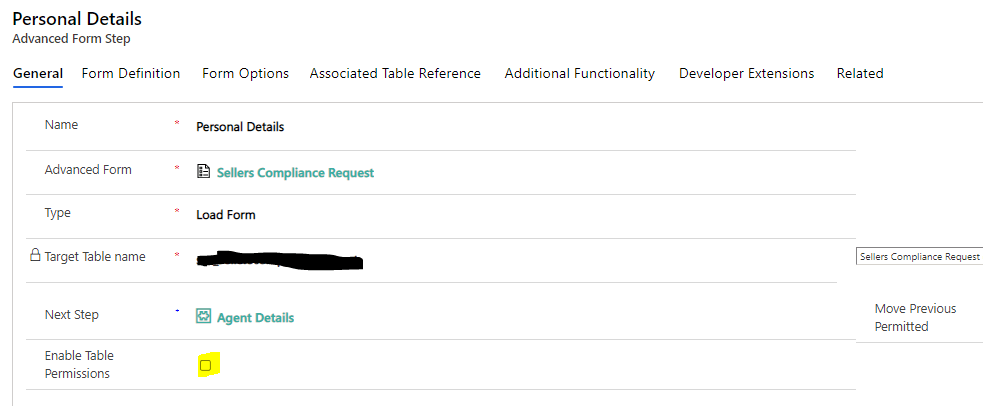
• Power Automate w Word Online: generate document updates

    Scenario:

    My client generates a summary document for applications lodged online. The generated summary could be manually edited by an officer. At the final stage of the application processing, it’s required to include additional information to the generated summary document regarding the outcome of the application. This information must be dynamically generated.

    This is a process diagram below:

    Multi-step document generation

    As you can see, the dynamic content for a document is generated twice: once during the document creation and a second time we update the existing document to add blocks of information that are not available at the earlier phase.

    The solution:

    We are going to use Power Automate with Word Online (Business) connector to generate and update the summary document.

    There is an article explaining how to prepare the template and discussing some limitations of the connector: https://learn.microsoft.com/en-us/connectors/wordonlinebusiness/

    Step 1. Prepare a document template.

    We must add all the fields to the template including fields we are going to populate later.

    Add fields with unique names

    I use Star/End tag for the Show As property to show you field names. Please use Bounding Box instead.

    I uploaded the document template to OneDrive.

    Step 2. Create a Power Automate flow to generate a summary (create)

    We use Populate a Microsoft Word template action of the Word Online (Business) connector to populate the template.

    For the Application record created the flow will be triggered. We make sure all the fields required for the first run are included in the action. Note the field Populate later is not populated. We keep it to be populated with the outcome at the second run.

    Generate document flow

    For the sample application record

    A sample Application record
    Successful flow run

    Document generated:

    Document generated

    The document is populated from the Application record. The outcome field remains unpopulated until the next run. This document now can be updated manually. Let’s add some content and then save.

    Add manual content to the generated document

    Step 3. Create a Power Automate flow to generate an outcome (update)

    Before we start building the update flow, in the original flow add some text to the Populate later field. Click on than Peek code.

    Find the correspondent parameter for the Populate Later field. In my case, it’s “dynamicsFileSchema/1762023507”. Save it.

    dynamicFileSchema parameter name

    The second flow is triggered on a status change. If the status is Outcome Received.

    Let’s see what’s inside!

    Getting the Application number

    We need to fetch the Application number to construct the correct file name.

    In the Populate a Microsoft Word template step/action we play a couple of tricks.

    First, we construct the dynamic file name using the data we retrieved in the previous step.

    Second, that dynamicsFileSchema we saved, remember?

    Let’s construct a JSON like in the screenshot below, using the dynamicsFileSchema values as a key and Outcome retrieved for the record as a value.

    Populate the updates

    In the last step, we just update the file with the content from the generation step.

    Update flow

    Let’s run the flow and see results!

    Successful run

    Hocus-pocus!

    You could see the file content contains the details from the first run, the manual updates, and the second run updates.

    The conclusion:

    As we can see, it is possible to generate document updates populating dynamic values with the data which is not available yet during the document creation. Sounds like black magic but it works! 🧙‍♀️

  • 5 reasons why (you believe) you can’t be Microsoft MVP and why you should rethink it

    Today is “that day of the year”, the MVP renewal day. You could see lots of posts on Twitter and LinkedIn about the event. MVPs are posting about being renewed for another year. It means more community work, opportunities, more tech knowledge shared, and more questions answered. It means more fun!

    I’ve been a part of the Microsoft MVP Award program for some time. People reach out to ask me about the program. They tell me they think about becoming an MVP one day, but… I’ve collected some “BUTs” for you and summarised some of your concerns in the article below.

    1. It’s not for me because I am an introvert (different, a private person, don’t fit in) And I don’t like public speaking!

    People you see on a stage, “the MVPs” look like they have no anxiety or fear of public speaking. They talk and laugh, they record videos, and organize conferences. They look so extrovert-ish. You feel it’s not for you as you won’t be able to do it the same way they do. And you’d rather die than be on that stage.

    There are many neurodivergent people, different people, people diagnosed with ADHD and never diagnosed but being on the spectrum, people with dyslexia and just different in a broader meaning of the word in the MVP community. There are introverts and extroverts. There are people with anxiety disorder speaking at events. Why? Because their fear of speaking is less than their desire to share. Also, it’s good to challenge yourself sometimes. There are people with dyslexia finding their own ways to read notes and excelling at presenting. Why? Their fear of failure due to their condition is less than their desire to share their passion with people. Also, it’s good to feel good after you get it done.

    2. I still don’t like public speaking! (don’t want to record YouTube videos, do TikTok, record a podcast etc)

    Don’t! Build dev tools (https://github.com/MscrmTools/XrmToolBox), write reviews and blog posts, organize user groups or contribute to open-source projects on GitHub instead.

    Nobody asks you to change or do something you don’t like doing. Do what you are passionate about. This is the only way to guarantee you aren’t going to stop doing it again and again.

    A great way to contribute is to be a part of the Power Platform Community( https://powerusers.microsoft.com) answering people’s questions.

    Power Platform Communities

    There are many great ways to help people and share knowledge. You could invent your own way.

    The MVP community needs all different kinds of people. Don’t be someone else, bring your awesome self!

    3. I don’t know where to start.

    As I mentioned above, there are many ways to contribute to the community. There are different ways to help people and share knowledge.

    I’ve heard it multiple times: “MVPs just naturally do what they like, what they are passionate about. They’ve been always doing what they are doing. Then they just got rewarded for it”

    What if you don’t know what you want to do? Does it mean you can’t be a “true MVP”?

    Some MVPs I know personally HAVEN’T BEEN ALWAYS DOING THAT. That one thing they are famous for. They wanted to do something but they didn’t know straight away what exactly. It takes time to figure things out. And it’s OK to not know where to start. Just start somewhere then keep going.

    4. I can’t find a unique topic. Someone has already posted something about everything.

    The Mark Smith (https://nz365guy.com/), I think it was him, said that you shouldn’t worry about not being the first person to write or talk about something as you’ve got your own unique perspective.

    This is true. Different people focus on different things, for the same topic you could read 100s articles, watch 100s videos, or listen to 100s of podcasts then write your own unique summary or review and people would find it useful. Because your perspective is unique.

    5. Some people are just born this way (to be community activists, but I am not)

    Hmmm it’s not true. It’s so not true!

    I’ve never wanted to do stuff for free: using my free time giving unpaid advice or spending my weekends writing articles or running in-person events where I buy food and drinks from my own pocket. Nah.

    I’ve never had time for community activities. I am a full-time working woman with a family and kids. I’ve never thought it’s important, I’ve never had time for that.

    Until I did. One day I woke up and the kids aren’t too young anymore so they don’t need me 24×7. Suddenly I had time and had a desire to do things “for free”, to do community work. And now I believe it’s important.

    Our life circumstances change, and we change as well.

    To summarise what I’ve just summarised 😎 To become the next Microsoft MVP you only need these two things: a passion for technology and a passion for helping people to become passionate about technologies.

    Hope it helps!

  • Top 5 features of Power Pages from  Power Apps Portal UI/UX pro

    I am very excited to share my initial thoughts about Power Pages and a new portal designer. It was a big announcement at MS Build today, if you missed it you can read the article here and then set up a trial to start playing with Power Pages.

    I’ve been working as a Dynamics 365 portal and Power Apps portal developer for many years. Recently, I made UI/UX for Power Apps portals one of my business directions. Because it’s not easy to find good portal developers but it’s even harder to find someone who could make a Power Apps portal look “pretty”

    It’s understandable that a new Power Pages designer doesn’t have all the functionality available just yet. However, even with the preview functionality, we’ve got many features that would make my life as a pro UI/UX designer so much easier. For developers and users who aren’t pro designers – you don’t need my services anymore 😉, you can just do it yourselves.

    Themes

    One of the main things in any portal design is a theme. Usually, a portal theme comes from some strict marketing style and branding documents for government organizations and not-so-strict marketing branding documents for other companies. That type of document may contain a font, colors, palette for normal text, lists, headers, and some design suggestions and guidance for designers to ensure consistency across websites developed.

    This is why Styling is a super useful and practical area for you to start with after choosing a portal template. Here you can set up your foundation for your text, headers, links, and even buttons. I am sure this area will be evolving quickly and we’ll see more features coming soon.

    Styling

    Landing page

    A landing page is something a designer spends a significant amount of time on. The great-looking landing page creates wow-effect which keeps a customer excited. It will be the place for your users to start their days. It has to look great, almost perfect!

    Using a Power Pages Landing page feature will give you a good start. The layout is good, really good.

    Landing page layout

    Just add your hero image or other blocks with splits in between – done!

    Cats website

    Image uploads

    Adding images as Web files was a nightmare! With the editor, you can add an image as a page component. Anywhere, literally!

    Image component

    Forms and lists

    I love this one badly! You can easily add any Dataverse table form as a basic form to your page. No extra steps, it will auto-create a Basic form in the system.

    Form component

    You don’t need to leave a designer to change permissions or add extra form fields. Everything in one place!

    Add form fields

    Adding lists to the page is also super-easy!

    Adding a list

    And more magic!

    Adding records to a list

    HTML editor

    As I mentioned, the visual editor may not have all the features just yet so having an option to manually dig into a code is super handy.

    HTML editor

    To summarise, Microsoft did a great job improving a UI/UX editor for a portal. With new Power Pages, you could build “pretty” portals easily. No designer super skills are required.

  • Where’s my old app designer?!

    Changes to UI are always fun. From the user experience perspective, they are challenging and somehow scary.

    I love a new app designer! It’s easy to use, it’s smart, and very user-friendly. However, today I need a new designer to make sure I’ve got all forms required added to my app.

    In the old designer you can check it. And in a new one – I’m not sure it’s even possible.

    In my old life, I could just go to the maker portal, select the app then click on Edit from the menu.

    Edit app

    Or just select Edit from the context menu:

    Edit app from the context menu

    The magic was happening and I was able to access what I need.

    Old app designer

    But not now!

    Today I tried and all I could see it’s just a new editor popping up like this.

    A new app editor

    Where’s my old editor?!

    Well, I had to guess it and I did, eventually. From the top menu Switch to classic.

    Top menu Switch to classic
    An old app designer

    Amazing!

  • Power Apps Portal: “Table permission changes for forms and lists on new portals” So what?

    In case you missed it…

    We’ve got a portal page with the form which is available for anonymous users. It’s a valid scenario. And the way we set it up previously was like this:

    Advanced form No authentication is required.

    Advanced form – no authentication is required.

    Advanced Form Step – Enable Table Permission option is not set.

    “Enable Table Permission” option wasn’t set.

    Also we didn’t define any permission for the table behind this form.

    It was working last week!

    As we were using a trial and portal did expire over the weekend when we un-expired it it got magically updated (I think this is what happened)

    So our form looked like this:

    You don’t have the appropriate permissions.

    After we made the discovery that the portal behaviour changed. Which is OK according to the documentation.

    Starting with release 9.3.7.x, newly created portals will have table permissions enforced for all forms and lists irrespective of the Enable Table Permissions setting.

    Also, with the same release, lists on all portals (new or existing) that have OData feeds enabled will require appropriate table permissions setup for the feed on these lists to work.

    To configure anonymous access explicitly, use proper table permissions, and web role setup instead.

    (Microsoft docs)

    https://docs.microsoft.com/en-us/powerapps/maker/portals/important-changes-deprecations#table-permission-changes-for-forms-and-lists-on-new-portals

    Let’s see what it means, really, for forms.

    Let’s say, you had the case like ours and your “Enable Table Permission” option is set to False.

    You need to create a Table permission for the table/entity behind your form (or multiple permission if you use multiple tables)

    Also, you will need to assign this permission to your portal web roles, specifically, to Anonymous Users role:

    Active Web Roles
    Anonymous Users

    Like this.

    Happy Monday!