Skip to content

Olena's Dynamics Blog (post-AI)

Writing as a human

  • Home
  • About
  • Contact
  • Videos
  • YanaLiz Blog

recent posts

  • !Importan! This blog is now an archive
  • How to send email receipt from Stripe in Power Pages payments
  • D365 user queue: control which emails are synced. Default to No email messages.
  • Integrate eSignature with Power Pages
  • Power Pages: Upload large files – work in progress

about

#womenintech #mvp #businessapplications #dynamics365 #dynamics365developer #powerplatform #solutionsarchitect #businessapplications #netdveloper #azuredeveloper #lovewhatido #supportwomenintech #blogger #diversity #microsoftdeveloper
  • Twitter
  • Facebook
  • Instagram
  • Simple Azure Invoice OCR Tutorial

    August 5, 2021

    We are exploring OCR capabilities for invoice processing. This is the article which may help you to understand how it work if you want to train a custom model to use it then with Power Automate.

    Do you want your own OCR which costs less than a coffee?

    All credits go to Nick Grischenko.

    https://microsoftbusinessappsfordummies.wordpress.com/2021/07/21/simple-azure-invoice-ocr-tutorial-that-costs-less-than-a-coffee/

    Man Drinking Coffee Pictures | Download Free Images on Unsplash

    Share this:

    • Share on LinkedIn (Opens in new window) LinkedIn
    • Email a link to a friend (Opens in new window) Email
    • Share on X (Opens in new window) X
    • Share on Facebook (Opens in new window) Facebook
    • Share on Telegram (Opens in new window) Telegram
    Like Loading…
  • How to โ€“ Get the size of tables in Dataverse / Dynamics 365

    How to โ€“ Get the size of tables in Dataverse / Dynamics 365

    August 4, 2021

    Nishant Rana's avatarNishant Rana's Weblog

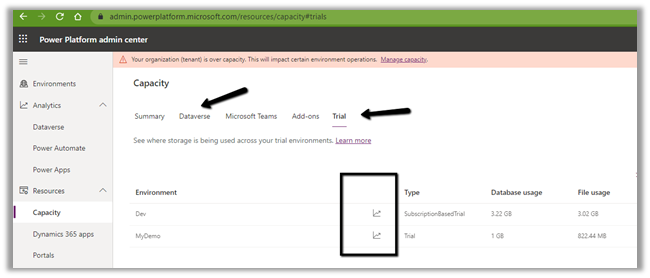
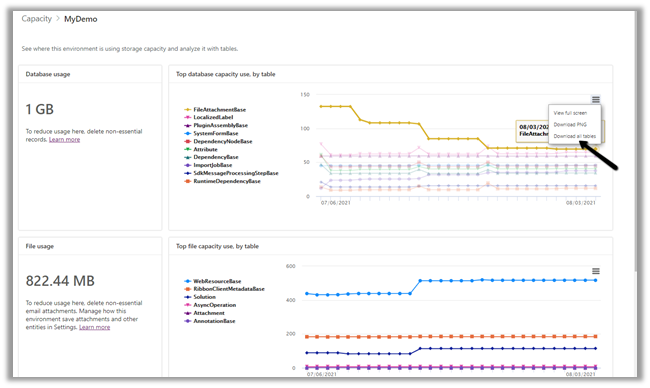
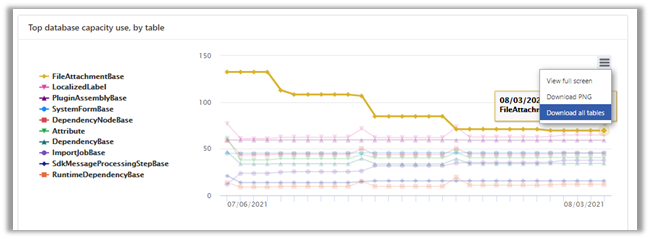
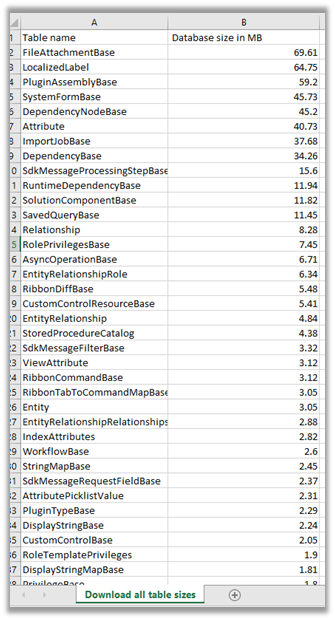
    Using the Capacity page in the Power Platform Admin Center we can extract the details of size occupied by table (in MB) within a particular environment.

    Login to the admin portal and navigate to Capacity

    https://admin.powerplatform.microsoft.com/resources/capacity

    Select the Dataverse tab and click on Details or in case of trial click on the Trial tab

    Here we have selected the details (graph) option for one of the environments.

    Select Download all tables option for the Top database capacity use, by table chart


    We can see the details within the extracted CSV file.

    Get all the details here

    https://docs.microsoft.com/en-us/power-platform/admin/capacity-storage#environment-storage-capacity-details

    Hope it helps..

    View original post

    Share this:

    • Share on LinkedIn (Opens in new window) LinkedIn
    • Email a link to a friend (Opens in new window) Email
    • Share on X (Opens in new window) X
    • Share on Facebook (Opens in new window) Facebook
    • Share on Telegram (Opens in new window) Telegram
    Like Loading…
  • Azure Storage integration for Power Apps portals

    Azure Storage integration for Power Apps portals

    July 20, 2021

    To answer the question Why? I say we run into some limitations with SharePoint integration.

    And now we are trying to explore other options. Let’s get started!

    Enable Azure Storage

    This is a great blog post here: Want to leverage Azure storage for your documents in PowerApps/ Dynamics 365 portals instead of Notes? Check this out – Debajit’s Power Apps & Dynamics 365 Blog

    Itโ€™s got some extra info which is missing in docs.

    Microsoft docs: Enable Azure storage – Power Apps

    Things to pay attention to while following the steps:There are two types of settings required for a portal: Settings and Site Settings. Pay attention.

    Create a container in the Azure storage you created. Microsoft docs are missing this but itโ€™s definitely required. It doesnโ€™t get created automatically you have to create it on Azure portal.

    There extra portal settings which may or may not be required. Doesnโ€™t hurt to set them up:

    Site Setting 3 Name: HTTP/Access-Control-Allow-Credentials Value: true

    Site Setting 4 Name: HTTP/Access-Control-Allow-Headers Value: *

    Site Setting 5 Name: HTTP/Access-Control-Allow-Methods Value: GET, PUT, DELETE, HEAD, POST

    Site Setting 6 Name: HTTP/Access-Control-Allow-Origin Value: <your crm url without any trailing slash>

    Site Setting 7 Name: HTTP/Access-Control-Expose-Headers Value: *

    Site Setting 8 Name: HTTP/Access-Control-Max-Age Value: 300 (itโ€™s value in seconds, you can specify 200/ 100 as well)

    Add the Azure Storage web resource to a form

    Microsoft docs: Add Azure storage web resource to a form – Power Apps

    I havenโ€™t found any tricks here. It just works if you follow the steps.

    Configure notes as attachments for basic and advanced forms

    Microsoft docs: Set up notes as attachments for basic and advanced forms – Power Apps

    Hereโ€ฆ two main things on top of all these micro and macro steps you have to perform:

    1. Make sure you added the permissions to the Web role you use. I know itโ€™s in the list. Still.
    2. Itโ€™s tricky. For the step:
    The old interface Activities Tab Properties

    It doesnโ€™t look like this on the classic UI. Also, you canโ€™t do it via new UI.

    This is how it looks like in classic:

    Classic UI but new options Activities Tab Properties

    And you go to the second tab and select Notes from there.

    Classic UI but new options Activities Tab Properties – Notes

    Now you all set to use the OTB Azure Storage integration with your portal documents.

    But what if you want to use the same integration to store your Dynamics 365 documents which are not uploaded via the portal?

    Have a look at the second part of our journey with Mira here: https://onlinemgblog.wordpress.com/2021/08/05/saving-a-note-attachment-to-azure-blob-storage-and-viewing-it-on-powerapps-portals/

    Share this:

    • Share on LinkedIn (Opens in new window) LinkedIn
    • Email a link to a friend (Opens in new window) Email
    • Share on X (Opens in new window) X
    • Share on Facebook (Opens in new window) Facebook
    • Share on Telegram (Opens in new window) Telegram
    Like Loading…
  • Power Automate with Dataverse: Saving API calls to Dataverse. Expand or Link-Entity?

    Power Automate with Dataverse: Saving API calls to Dataverse. Expand or Link-Entity?

    July 2, 2021

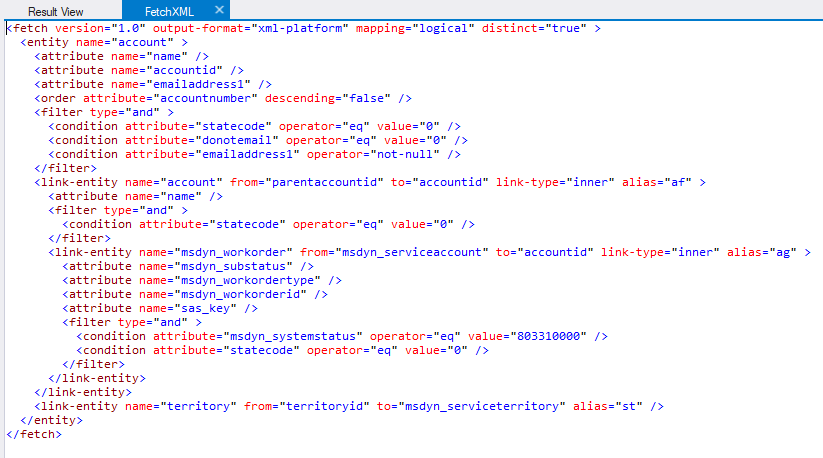
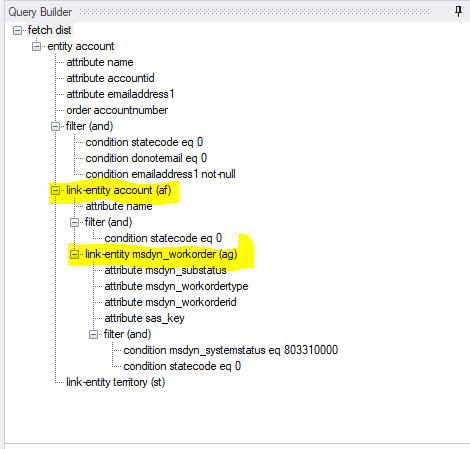
    Within Power Automate I am trying to make SINGLE(paginated) call to Dataverse to get the list of Work Orders with the particular status linked to Account but not directly but via extra layer. Also, I can retrieve extra lookup tables which are required by logic.

    All in a single call because making extra API calls is expensive and evil! ๐Ÿ˜ˆ

    The FetchXML query looks like one below:

    Query WO for Clients

    I build my queries in XrmToolBox. It’s free community tools but don’t forget to support people who build tools and donate money to say Thank You!

    If you try to use Web API query instead you get the error like one below:

    {“error”:{“code”:”0x0″,”message”:”The navigation property ‘msdyn_account_msdyn_workorder_ServiceAccount’ cannot be expanded. Only many-to-one relationships are supported for nested expansion.”}}

    It’s easier to understand if you look at the tree structure:

    Nested expansion

    What do we do then?

    Make sure you used alias for each “link-entity”:

     <link-entity name="msdyn_workorder" from="msdyn_serviceaccount" to="accountid" link-type="inner" alias="ag" >
    

    We use FetchXML with Power Automate like this:

    FetchXml query in Power Automate.

    The result will contain all your 1:M and M:1 data in the flat kind of shape:

    {"body": {
        "value": [
    {
      "@odata.type": "#Microsoft.Dynamics.CRM.account",
      "@odata.id": "https://tetttt.crm6.dynamics.com/api/data/v9.1/accounts(xxxxxxxx-xxxx-xxxx-xxxx-xxxxxxxxxxxx)",
      "@odata.etag": "W/\"000000000\"",
      "@odata.editLink": "accounts(xxxxxxxx-xxxx-xxxx-xxxx-xxxxxxxxxxxx)",
      "accountid@odata.type": "#Guid",
      "accountid": "xxxxxxxx-xxxx-xxxx-xxxx-xxxxxxxxxxx",
      "emailaddress1": "test@mail.com",
      "accountnumber": "C11111111",
      "name": "X Client",
      "ag.msdyn_substatus@OData.Community.Display.V1.AttributeName": "msdyn_substatus",
      "ag.msdyn_substatus@OData.Community.Display.V1.FormattedValue": "Status Status",
      "ag.msdyn_substatus@Microsoft.Dynamics.CRM.lookuplogicalname": "msdyn_workordersubstatus",
      "ag.msdyn_substatus@odata.type": "#Guid",
      "ag.msdyn_substatus": "xxxxxxxx-xxxx-xxxx-xxxx-xxxxxxxxxxx",
      "ag.msdyn_workordertype@OData.Community.Display.V1.AttributeName": "msdyn_workordertype",
      "ag.msdyn_workordertype@OData.Community.Display.V1.FormattedValue": "Type",
      "ag.msdyn_workordertype@Microsoft.Dynamics.CRM.lookuplogicalname": "msdyn_workordertype",
      "ag.msdyn_workordertype@odata.type": "#Guid",
      "ag.msdyn_workordertype": "xxxxxxxx-xxxx-xxxx-xxxx-xxxxxxxxxxx",
      "ag.msdyn_name@OData.Community.Display.V1.AttributeName": "msdyn_name",
      "ag.msdyn_name": "WO-1000003",
      "af.name@OData.Community.Display.V1.AttributeName": "name",
      "af.name": "Name ",
      "ag.msdyn_workorderid@OData.Community.Display.V1.AttributeName": "msdyn_workorderid",
      "ag.msdyn_workorderid@odata.type": "#Guid",
      "ag.msdyn_workorderid": "xxxxxxxx-xxxx-xxxx-xxxx-xxxxxxxxxxx"
    }
    ]
    }}

    If you have 1 account with 3 Work Orders you will get 3 records in the result JSON with the account info repeating 3 times in each record.

    Let’s say you iterate through the list via Apply for each.

    Each column regardless of table and expansion level you will query the same way in Apply for each prefixing column names with the aliases specified in FetchXML:

    For level 1 account column:

    items('Apply_for_each')?['accountnumber']

    For level 2 account column:

    items('Apply_for_each')?['af.name']

    For level 3 work order column:

    items('Apply_for_each')?['ag.name']

    Happy days!๐Ÿ˜Ž

    Share this:

    • Share on LinkedIn (Opens in new window) LinkedIn
    • Email a link to a friend (Opens in new window) Email
    • Share on X (Opens in new window) X
    • Share on Facebook (Opens in new window) Facebook
    • Share on Telegram (Opens in new window) Telegram
    Like Loading…
  • Power Automate with Dataverse: “Apply to each” current item/previous item

    Power Automate with Dataverse: “Apply to each” current item/previous item

    July 1, 2021

    Recently I was working on the solution and in the middle of the development discovered that I desperately need to refer to the previous item in the loop.

    Let’s say, I iterate through the list of items I received via List Rows (Dataverse). I check a condition in the next iteration and based on the condition I need to do something with the item from the previous step. I know it sounds crazy. But I will explain why in the next post, promise. For this article it doesn’t really matter why.

    I need to refer to the previous item. How do I do this? I Googled. I am very good at it. Yet I couldn’t find anything which could help me thinking. Then I did. I like to be grateful so this is the link:

    https://sharepains.com/2018/12/18/filter-an-array-power-automate/

    It’s a different topic but this is how I realized the exact steps I need to perform.

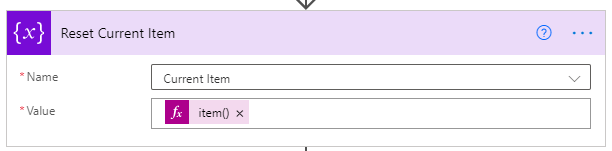
    1. I need a variable Current Item. I am looking at referring to multiple columns of the item, not just name or ID so I can’t simple store it in the string variable. I need type Object.

    2. Inside “Apply to each” I need to populate it like this:

    item()

    3. To read columns, in my case it’s name, of the previous item (and many other columns which I can easily access now) It’s not a current item anymore, it’s a previous item. So if you are OCD something, rename it to something like Stored Item ๐Ÿ˜€:

    variables('Current Item')?['name']

    Super easy!

    Share this:

    • Share on LinkedIn (Opens in new window) LinkedIn
    • Email a link to a friend (Opens in new window) Email
    • Share on X (Opens in new window) X
    • Share on Facebook (Opens in new window) Facebook
    • Share on Telegram (Opens in new window) Telegram
    Like Loading…
Previous Page Next Page

Create a website or blog at WordPress.com


Loading Comments...
 

    • Subscribe Subscribed
      • Olena's Dynamics Blog (post-AI)
      • Join 60 other subscribers
      • Already have a WordPress.com account? Log in now.
      • Olena's Dynamics Blog (post-AI)
      • Subscribe Subscribed
      • Sign up
      • Log in
      • Report this content
      • View site in Reader
      • Manage subscriptions
      • Collapse this bar
    %d